
Custom Sequence#
XChroma is built to handle custom-made acquisition sequences for your experiments.
To do this, you must write a class inherited from the SequenceWorker class, define your custom run method, and then export it and define arguments in the main.py file.
Directory structure of the files used :
XChroma/
├── XChroma/
├── main.py
└── sequence.py
A Simple Sequence#
Let’s build a simple sequence that performs measurements to get absorbance and save it.
Step 1: Define the Class in sequence.py#
First, let’s define the class in the sequence.py file:
from XChroma.sequence_control import SequenceWorker

class SequenceSimple(SequenceWorker):
    def run(self):
        # Here goes the sequence code
The class needs to be inherited from the XChroma.sequence_control.SequenceWorker.
Step 2: Define the Measurements#
To get the absorbance spectrum, we need 3 different measurements:
The intensity spectrum of interest
A baseline from a reference curve (zero)
A dark signal spectrum
We will also use input() to introduce delays between the measurements.
from XChroma.sequence_control import SequenceWorker


class SequenceSimple(SequenceWorker):
    def run(self):
        print("Sequence started!")
        self.reset_servo() # Make sure all shutter are closed to start
        self.controller.send_command("a")  # Open the shutter for the probe signal

        # Measurement of the baseline
        _ = input("Put the Baseline (zero) sample. Please ensure you get signal from the spectrometer.")

        self.data_spectro.lavg.clear()
        time.sleep(10)  # Wait for automatic averaging as defined in the interface
        self.data_spectro.save_data(self.data_spectro.avg_i, cycle=0, spectype="zero", csv_path="Spectrums.csv")
        self.data_spectro.zero = self.data_spectro.avg_i

        self.progress_signal.emit(int(33))  # Update progress bar to 33%

        # Measurement of the sample
        _ = input("Put the sample.")

        self.data_spectro.lavg.clear()
        time.sleep(10)  # Wait for automatic averaging as defined in the interface
        self.data_spectro.save_data(self.data_spectro.avg_i, cycle=0, spectype="sample", csv_path="Spectrums.csv")
        self.data_spectro.zero = self.data_spectro.avg_i

        self.progress_signal.emit(int(66))  # Update progress bar to 66%

        # Measurement of the static signal
        self.reset_servo()  # Make sure servos are shut for the dark measurement
        time.sleep(10)  # Wait for automatic averaging as defined in the interface
        self.data_spectro.save_data(self.data_spectro.avg_i, cycle=0, spectype="static", csv_path="Spectrums.csv")
        self.data_spectro.static = self.data_spectro.static

        self.progress_signal.emit(int(100))  # Update progress bar to 100%

        self.controller.send_command("a")  # Open the shutter to view the result in the app

        self.finished_signal.emit()  # Mandatory!
Step 3: Use the Sequence in main.py#
Now, in the main.py file, import your custom sequence:
from sequence import SequenceSimple
Then, add it to the sequence_dict:
sequence_dict = {
    "Sequence Simple": {"class": SequenceSimple, "args": {}},
}
sequence_dict["Sequence Simple"] = {"class": SequenceSimple, "args": {}}
Step 4: Run Your Application#
You can run your app and see the results !
python main.py
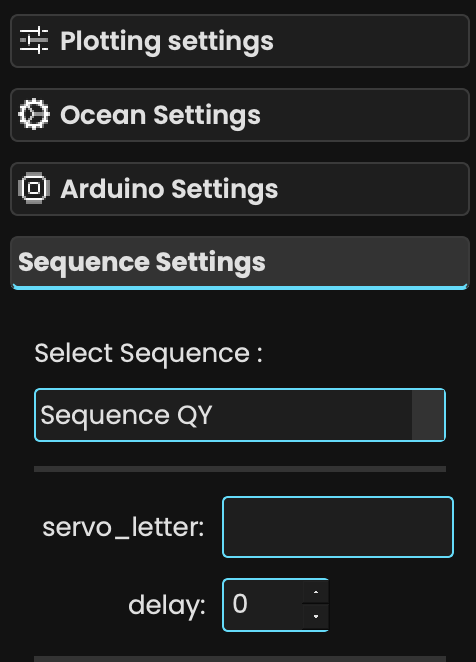
Adding GUI control#
To add GUI control over the parameters of the Sequence, some steps differ from the basic sequence.
Update the Class Definition#
First, modify the class to include a new __init__ method to handle the additional parameters coming from the GUI. The class will now accept parameters such as delay and servo_letter from the GUI, in addition to controller and data_spectro.
from XChroma.sequence_control import SequenceWorker

class SequenceSimple(SequenceWorker):
    def __init__(self, controller, data_spectro, delay, servo_letter):
        super().__init__(controller, data_spectro)  # Mandatory!
        self.delay1 = delay  # Store delay value
        self.servo_letter = servo_letter  # Store servo letter for reuse in the run method

    def run(self):
        # Here goes the sequence code
Caution
In this case, the controller and data_spectro arguments need to be passed to the parent class (via super()), and the additional arguments can be of type str, float, or int.
Add the Sequence to main.py#
To use this new sequence in main.py, you need to update the sequence_dict to pass the new arguments (servo_letter and delay).
sequence_dict = {
    "Sequence Simple": {"class": SequenceSimple, "args": {"servo_letter": str, "delay": int}},
}
sequence_dict["Sequence Simple"] = {"class": SequenceSimple, "args": {"servo_letter": str, "delay": int}}
Caution
Don’t forget to define the parameters correctly in the GUI before running the sequence.
Run the Application#
Once everything is set up, you can run the app with:
python main.py
Use GUI Parameters in the run Method#
Now that you have added the necessary parameters to the class, you can use these GUI-defined parameters of the run method.
For example, you can use the delay parameter to add a sleep time before running the next step, and the servo_letter parameter to control witch servo is used:
def run(self):
    time.sleep(self.delay1)  # Use the delay parameter defined in the GUI
    self.controller.send_command(self.servo_letter)  # Send the command with the selected servo letter
    # Add more sequence steps...